A vent covered in grey dust does more than look neglected. It can restrict airflow, circulate settled particles back into a room and make an otherwise well-maintained property feel less fresh. Knowing how to clean air vents correctly helps keep your heating, ventilation and air conditioning system working as intended, without damaging grilles, ductwork or electrical components.
For most homes and small commercial premises, routine vent cleaning is straightforward. The key is to clean the visible grille thoroughly, deal carefully with accessible dust just behind it, and recognise when a deeper system inspection is the sensible next step.
How to Clean Air Vents in Your Home or Workplace
Start by identifying the type of vent you are cleaning. Supply vents blow conditioned air into the room, while extract vents remove stale or moist air. You may also have return-air grilles, which draw air back towards a central system. Although the basic cleaning process is similar, return grilles and bathroom or kitchen extracts often collect more dust, fluff and grease.
If the vent is connected to an air conditioning unit, mechanical ventilation system or powered extractor, switch the relevant system off before you begin. This prevents dust being pulled into the equipment while you work and avoids a grille moving unexpectedly. For a commercial property, follow the site’s isolation procedures rather than simply using a local switch.
Put down an old towel or sheet beneath the vent, especially if it is high on a wall or ceiling. Dust can fall surprisingly quickly once the grille is disturbed. You will usually need a vacuum cleaner with a soft brush attachment, a microfibre cloth, warm water, mild washing-up liquid and a dry towel. A step ladder may be needed for ceiling vents, but do not overreach or balance on furniture.
Remove loose dust first
Use the soft brush attachment to vacuum across the front of the grille. Work along the slats from several directions so that dust is lifted rather than pushed farther inside. A dry microfibre cloth or soft paintbrush can help reach narrow gaps.
Avoid using a high-powered vacuum nozzle directly against thin plastic slats. Older grilles can become brittle, and excessive pressure may crack or bend them. If a vent cover is painted in place, take additional care around its edges to avoid pulling away paint.
Take off the grille if it is designed to be removed
Many vent covers are fixed with two or four screws. Hold the grille securely while removing the final screw, then place the fixings somewhere safe. Take a quick photograph first if the grille has adjustable louvres or an unusual orientation. It makes refitting easier.
Do not force a cover that does not release easily. It may be sealed, wired to a fan assembly or part of a fire-rated ventilation arrangement. This is particularly relevant in communal buildings, commercial kitchens and properties with mechanical ventilation systems. In those cases, cleaning the visible face is safer than dismantling it without professional advice.
Wash the grille carefully
Wash removable metal or plastic grilles in warm water with a small amount of mild detergent. Use a soft cloth or soft-bristled brush to remove dirt from each slat. Greasy kitchen extract covers may need a second wash, but harsh degreasers and abrasive pads can strip coatings or leave marks.
Rinse the grille and dry it fully before refitting. Moisture left on a metal cover can encourage corrosion, while water near electrical components is never a good idea. A dry cloth followed by a short period of air drying is usually sufficient.
Clean just inside the opening, but do not reach deep into ductwork
With the grille removed, vacuum the immediate opening using a brush attachment. This is useful for removing the dust that collects around the edge of the duct or vent box. Wipe accessible surfaces with a barely damp cloth, then dry them.
Do not insert long tools, household brushes or wet cloths deep into the duct. You could dislodge insulation, damage flexible ducting or push contamination farther into the system. More importantly, visible dust inside a duct does not automatically mean the whole system needs aggressive cleaning. The right approach depends on the system type, the condition of the ducts and whether there is evidence of a genuine airflow or hygiene problem.
Refit the vent and check the airflow
Once everything is dry, replace the grille without overtightening the screws. Set adjustable louvres back to their original position unless they were clearly directing air at a wall, curtain or workstation. Turn the system back on and check that air is moving freely.
A light, even flow is what you are looking for. If airflow remains weak, one clean grille may not be the answer. A blocked filter, closed damper, dirty indoor unit, fan fault or poorly balanced system could be the cause.
Cleaning Air-conditioning Vents Is Not the Same as Cleaning the Unit
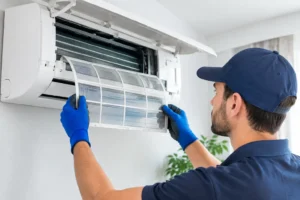
Wall-mounted split air conditioning units are common in Essex homes, shops and offices. The front outlet louvres can be dusted gently as part of normal housekeeping, but the unit also contains filters, a coil, a condensate tray and a fan barrel. These parts have a direct effect on cooling performance, energy use and indoor air quality.
Most manufacturers allow the user-accessible filters to be removed and cleaned. Always check the unit instructions first, switch off the power, and make sure filters are completely dry before reinstalling them. Do not spray water, fragrance products or cleaning chemicals into the indoor unit. Liquid can reach electrical parts, while residue on the coil or fan can attract even more dust.
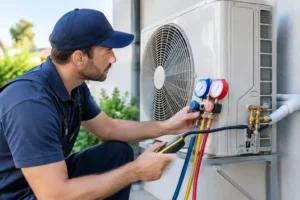
If you can see black spotting, heavy debris behind the louvres, water dripping from the unit, unpleasant smells when it runs or a notable loss of cooling, arrange professional maintenance. These signs can point to blocked drainage, biological growth, a dirty coil or another fault that a surface clean will not resolve.
How Often Should Air Vents Be Cleaned?
There is no single schedule that suits every building. In a typical household, cleaning visible air vents every three to six months is a sensible starting point. In kitchens, bathrooms, homes with pets, busy offices, salons, workshops and rental properties with frequent occupant changes, monthly visual checks are worthwhile.
Pollen season, building work, redecorating and carpet replacement can all increase airborne dust. After any work that creates fine debris, inspect filters and vents promptly rather than waiting for the next planned clean. A clean grille cannot compensate for a clogged filter elsewhere in the system.
For managed commercial buildings, incorporate vent checks into planned maintenance. This creates a record of the condition of grilles, filters and visible airflow, making it easier to spot a recurring problem before it affects staff, customers or equipment.
When Cleaning Vents Is Not Enough
Some warning signs call for a qualified inspection rather than more cleaning. Persistent musty smells, repeated mould around a vent, soot-like deposits, rattling fan noise, condensation, water leaks and rooms that remain stuffy all suggest an underlying issue. So does dust returning very quickly after cleaning.
In a bathroom or kitchen, poor extraction may be caused by a blocked external grille, damaged ducting, a weak fan or an incorrectly sized system. In air-conditioned spaces, restricted airflow can indicate dirty filters, coil contamination, fan problems or controls that need adjustment. Each fault needs a proper diagnosis, not a guess.
Landlords and business owners should be particularly cautious where ventilation affects damp control, occupant comfort or equipment cooling. A temporary improvement from cleaning can hide a developing fault, leading to higher repair costs later.
A Safer, Cleaner Result From Routine Maintenance
Regular vent cleaning is a small task, but it supports a more comfortable property and makes changes in system performance easier to notice. Clean the grille, check that air can move freely and keep filters on the right maintenance schedule. That simple routine is usually more effective than trying to clean deep into ductwork without the right equipment.
If your vents are repeatedly dirty, airflow is poor or your air conditioning needs more than a wipe-down, Essex Air Conditioning can assess the system and recommend the most practical next step. A professional check gives you a clear answer on what needs cleaning, repairing or maintaining – and what does not.